| Building
a Collaborative Web Project |
|||||
| Define | |||||
| Design | |||||
Deliver
|
|
|||||||||||
Uploading with WS_FTP
This document illustrates how to use WS_FTP on a PC to upload your files. In this example, the name of the server is "cyberfair.gsn.org." Be sure and use the server name that your network administrator gives you.
Opening a Connection to the Server
Once you are on-line, open WS_FTP. You will be prompted to enter some information to tell WS_FTP about the connection. If for some reason you are not prompted automatically, click on the Connect button in the lower left corner of the WS_FTP screen.
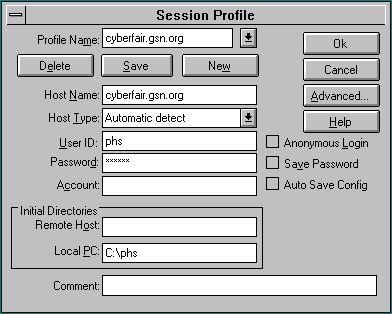
Below is a sample of the correct way to make a connection.
Start by clicking on the New button.
Profile Name is the name that you will give to the settings for the Web server, in
this example "cyberfair.gsn.org". In the future you will be able to connect to
the server by selecting this Profile Name from the pull down menu. You should choose a
name like "CyberFair" or "cyberfair.gsn.org"
Host Name is the actual domain name of the machine that you want to connect to. In this example it is cyberfair.gsn.org
User ID is the login name for your account. You receive this information from your network administrator. In this example we are using phs as the login name.
Password is the password that you received from your network administrator. Remember your login name and password are both case sensitive.
LocalPC is the name of the directory on your local machine that has your files. In our case it is phs.
Once you have entered all of this information, click on the Save button so that you can use these settings again.
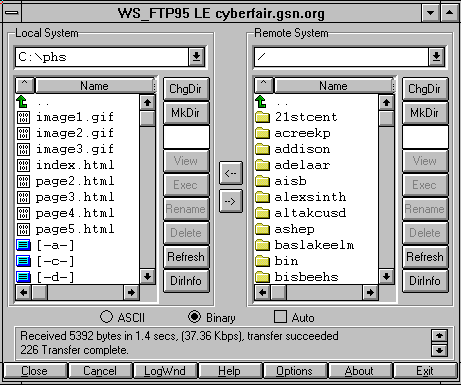
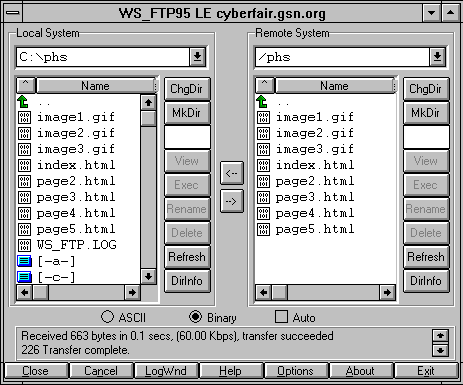
Local System (left) Window:
The left window shows you the files on your own computer. Note that in our
example we chose to start in the correct directory, LocalPC C:\phs. If you
happen to leave this option blank, you will start at your top directory C: and can use the
ChgDir button to change to the directory where your Web project is located on your
local hard drive.
Remote System (right) Window:
Once you have connected to the server, you will find yourself logged directly
into your own FTP server area which is displayed in the right window.
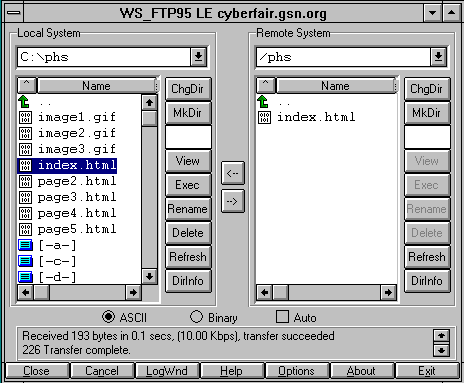
Note: In some cases, you may find that you must navigate to your own Web directory. If this is the case, you will see a screen similar to the one below. In the right window you will see the top directory on your server. You will need to move to your own directory. You can do this by using the ChgDir (in the right window) or by simply scrolling down until you see your directory and then double clicking. Although you may be able to read (but not write) in other directories, please respect the rights of others and don't. If you want to see what another directory has in it - use your web browser.
Uploading your files to the server
Beneath the two windows are three radio buttons.
- ASCII button should be checked when you are moving only text files (*.txt, *.htm).
- Binary button should be checked when you are moving only binary files (all multimedia and graphics: *.gif, *.jpg, *.mov, etc).
- Auto button should be checked when you are moving files of both types.
For now, check the Auto button.
Then highlight all of your files and folders in the left window.
Finally, to begin the file transfer, click on the button marked with the --> arrow. Notice the direction of the arrow, it points to the destination of the file transfer: from Local system to Remote system.
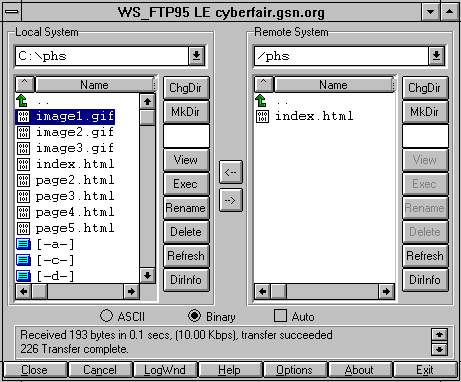
Uploading Images (or other media such as movies, sound files, etc.)
If when testing your pages the graphics or multimedia don't seem to work properly, you may need to re-upload them as binary files.
To upload any media files, you must use BINARY mode. Back to our example, we highlight image1.gif in our phs directory. Then we click on the BINARY radio button and click on the --> arrow.
Once you have uploaded all of your files, the contents of your directory on your project Web server should match your local working directory.
Deleting Files
Now, let's suppose that you want to remove a file that is on the server.
Let's say that image1.gif was the wrong file, and you want to delete it.
First, highlight image1.gif in the right window. Next, click on the Delete button
on the right (the one associated with the server). That's it! The file will be deleted.
Congratulations! This is 90% of what you will use when transferring files to any server!
While WS_FTP has many other features and options, we have only covered those necessary to upload your Web project.
Best of luck in Uploading!
page 1: Upload your Project
page 2: Beta test
page 3: Final check